Wireless fence system KD661 easy Set-up
1.Power on transmitter or receiver collar
Press the Power button and hold 3 seconds to make sure transmitter or receiver collar turn on.
2.Pair the transmitter with receiver collar
Turn on the transmitter and press the power button shortly. It will display “1dp” and flashes, which indicates the transmitter is in status of pairing
Then, power on the receiver collar and press the power button shortly, it will receive the pairing signal from transmitter and start pairing, When the receiver issued a single sound of “Bi” and blue LED flashes once, the transmitter is pairing is successfully with THIS receiver collar.
Notice: You must press the transmitter and receiver collar SHORTLY, to make it in pairing status. Once you press and hold the power button for 3 seconds, the device will turn OFF.
3.Set up the remote control range
The remote control range is a straight distance between transmitter and receiver collar. For this wireless fence KD661,the max. distance is up to 500 meters. To set up the proper distance, you can adjust the power level of transmission signal.
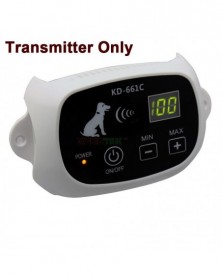
Press button”+” or”-” on the transmitter, you can increase or decrease the power level from O to 100 degrees. the value you are setting will display on the screen.
Power Level - Remote Control Distance
10 - 25m
20 - 50m
30 - 65m
40 - 80m
50 - 95m
60 - 115m
70 - 140m
80 - 170m
90 - 230m
100 - 500m
Below table is correspondence between power level of transmission signal and remote control distance. Please set the proper power level according to the control distance you want.
4.Verify the function of wireless fence system
To validate the fence system and remote control distance. Please follow as below steps:
1.Power on the transmitter and set the power level to 10,
2.Turn on the receive collar and take away from transmitter. It will release warning sounds “Bi-Bi”, while the receiver is about 20 meters far way.
3.After 3 times warning sound, it will change to static shock mode automatically. Take away the receiver and place the test LED on the contact probes of receiver, the LED will turn on. lf the receiver collar is kept away, the shock intensity will be gradually increasing. As result, the LED will be brighter gradually.
5.Put the transmitter in right place
To avoid transmission signal strength and remote distance affected by the surrounding environment, please place the transmitter l.5 meter above the ground, and make sure there is no any metal wall around it.
6.lmportant Notice:
During the system is running smoothly, the transmitter has been powered off somehow, the receivyer will automatically start up warning sound and then static stimulation, which is similar that the receiver is beyond the setting range.
Reset Operation
1.Reset Transmitter: if the battery is full capacity, but the transmitter can't power on, please press the RESET button to restart it. Then it will be powered on.
2.Reset Receiver: when the batter is full capacity, but the receiver collar can't power on, please charge the receiver collar again for one or two seconds to make it RESET. Then it will be powered on.
Products Description
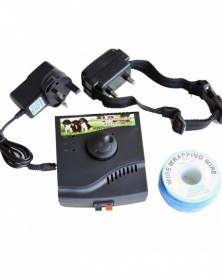
The electric pet fencing system KD661, is one of the most reliable and safest wireless fence. It has the same principles as an underground fence and is completely wireless. To be instant and portable, so it is great for travel. The wireless fence uses a constant radio signal to create a “safety zone” with range up t0 500 meters. If the dog is beyond the setting distance, The receiver collar will start up by a warning tone, then static shock until your dog comes back to “safety zone” ,
2.Main Features:
1. Completely wireless system,
2. A circular signal area based on central of transmitter,
3. The max. range is up t0 500 meters and min. range is 20 meters from transmitter,
4. An unlimited number of receivers supported at same time,
5,100 levels of intensity with no jump step for remote range adjustment,
6. The current intensity will be display in transmitter screen,
7. It is very easy for coding between transmitter and receiver,
8. Rechargeable and waterproof receiver collar
9. Pulsed proportional stimulus-it is more close your dog gets to the boundary, the shock will be more intense,
10. Progressive tone stimulus--a warning tone first and then shock stimulus if our dog would not stop move to the boundary,
11. You can set control range within the max. range ,
Parts Including:
*Transmitter
*Receiver
* Test Light Tool
*Charger
*strap
* Probes *4 (2 short ones and 2 long ones)
How to Set up the fence system
A. Set up the Transmitter
1. Power ON or OFF:
Power on/off the transmitter, by press and hold ON / OFF button for 3 seconds.
2. Power Level Adjustment:
Press the button “+” or”-” for adjustment of transmitting power level, which will changes remote control range of this system, Press button “+” to increase the power level, the Max. value is level 100, which the Max control range is 500 meters. Button”-” for level decreasing, the Min. value is 0. The setting value will be displayed on screen.
3. Make sure the transmitter is on, then press on/off button shortly to enter coding status. The screen will display “1dp” with flashing.
4.The transmitter must be powered by AC adapter, which the output is 5V/1A
B. Set up the Receiver Collar
1. Parts Assembly:
Assemble the 2 probes in the screws, which is at the bottom of receiver. (Notice: 2 short probes are suitable for small dogs, and 2 long probes for medium or big dogs. )
Then, make the TPU strap across back and both holes of receiver, to fix strap on the receiver with proper tightness.
Below table will show you the size and weight of your dogs:
Size - Dog Weight
small - <25 Pounds
Medium - 25~80 Pounds
Big - 80~120 Pounds
Large - >120Pounds
2. Power ON/OFF:
Keep pressing the button “ON/OFF” for 3 seconds to turn it on. And it w? indicate with “Bi-Bi” sound and LED flashing once.
3. Enter coding status
Press on/off button shortly to enter coding status, once the transmitter is on.
4 Charging battery
Please charge it when the red LED is flashing, it means low battery. The charger is common with that of transmitter. When it is fully charged, the LED will change to blue.
The receiver Collar is rechargeable and waterproof. For using it at first time, please charge it at least 4 hours.
How to Training your dog
Coding between transmitter and receiver
Make sure transmitter and receiver are close and power on. Shortly press “on/off' button of both devices to enter coding status, the screen will display “1dp” with flashing. The coding is successful while the receiver sounds “Bi-Bi” and blue LED flashes one time.
2. Put the receiver collar on the neck of your dog, and check the tightness is proper.
3. Power on transmitter and set the power level to proper value by pressing “+/- “ button on the transmitter. The value will display on the screen. The power level is higher and the remote control range is wider, blew table show you the relationship.
Notice: The remote control distance is measured in pen area, it will be affected by electromagnetic waves or obstacle around the fence system, and the distance will be reduced slightly.
4. Place the transmitter is more than l.5 meters from ground, and there is no any metal wall around it.
Notice: the system could support multi- receivers, you can get another receiver and code it with the same transmitter according to step 1
Please use AC adapter same one as Transmitter adapter to charge the collar.
How does the fence system work
1. Start up the system
The system will start up while your dog is running beyond the setting distance, the receiver collar in your dog neck will issue warning signal by “Bi-Bi” sounds and static shock, so as to remind or prevent your dog moving on.
2. Work mode:
In work status, the red LED will flash ever3t 2 seconds. If the receiver is out of setting range from transmitter, it will sound 'Bi-Bi” 3 times firstly, and then start up static shock and increasing intensity from level l to level 4 .
3. Sleeping Mode
It will automatically go into sleeping and power-saving mode, when the receiver is standby and no any moving for more than one minute.
Once the receiver is moving, it w… be waked up immediately.
How to Verify the Function
To verify the function of warning sound and static shock to be start up properly, please operate it as below steps:
1. Make sure both transmitter and receiver in work status, and set the power level for transmitter accordingly.
2. Place the receiver beyond the remote control distance that you set just now,
3. You should listen “Bi-Bi “ sounds from receiver immediately. Otherwise, the function of warning sounds is improper.
4. Place the testing LED light on probes of receiver before the third warning sound be received, and then LED will be turned with gradual brightness. Otherwise, the function of static shock is improper.
Important Notes:
1. The wireless fence system is intended to use for dogs only.
2. Alow battery may cause intermittent operation. Do not use it and charge it immediately for a low battery.
3. DO NOT leave the collar on your dog for more than 10 hours per day.
4. Keep the receiver collar away from children.
5. Read all instructions before using this product. collar receiver is working properly. Also, testing the system will verify the field width setting is correct. To test, attach the supplied test light to the collar receiver probes. holding the receiver by the case, NOT by the probes, walk into the signal field. listen for the warning tone to sound and the test light to illuminate.
6. Avoid using your devices light close to the eyes of children or animals.
7. Do not use the device during a thunderstorm. Thunderstorms can cause the device to malfunction and increase the risk of electric shock.
8. Never adjust the transmitter while your pet is wearing the receiver collar.
9.unptug the transmitter when the system is left unused for extended periods.
10. these products are for outdoor use only.
Step-by-Step Instructions
Successful use of your system relies on “avoidance training” techniques. If your pet enters an avoidance zone, he will receive an audible warning. ff he goes further into an avoidance, the audible warning is quickly followed by a mild electrical stimulation or correction an unpleasant but safe experience. As training progresses, your pet will quickly learn to stay away from areas that he associates with the audible warning.
Ensure that the transmitter and boundary wire are properly installed and that the receiver collar is adjusted appropriately for your pet.
Place boundary flags on the edge of the avoidance area where the receiver collar picks up the audible signal. The boundary flags serve as visual clues for your pet while he is learning which areas are safe and which areas to avoid.
Attach a leash to your pets regular collar and approach the avoidance area. As you near the flags, shake a boundary flag in front of him, and firmly say, “Watch out !”or “Careful!”
Allow your pet to walk past the boundary flags. As he crosses into the avoidance area, he will receive an audible warning followed shortly thereafter by an electrical stimulation. Immediately call out “watch out”,and pull your pet back from the avoid an cezone.
Again, allow your pet to approach the boundary flags. If he retreats when he hears the audible warning, reinforce the behavior with praise and affection. If your pet fails to stop at the audible warning, shake the flag and say “ watch out “ as he nears the avoidance zone. Use the leash to pull him back to the safety zone before he crosses completely into an avoidance zone.
Troubleshooting
If your pet enters the avoidance area without responding to the correction signal, make sure that both the transmitter and the receiver collar are “on” and working. If both the transmitter and the receiver are functioning properly, you may need to increase the signal range on the transmitter or the correction level on the collar.
Reminder: never adjust the transmitter while your pet is wearing the receiver collar.
Reset Operation
1.Reset Transmitter: if the battery is full capacity, but the transmitter can't power on, please press the RESET button to restart it. Then it will be powered on.
2.Reset Receiver: when the batter is full capacity, but the receiver collar can't power on, please charge the receiver collar again for one or two seconds to make it RESET. Then it will be powered on.
When the transmitter indoor usage please help increase the transmitter signal levels accordingly because of the obstruct of the house structure.
IMPORTANT Notice :
When the transmitter indoor usage please help increase the transmitter signal levels accordingly because of the obstruct of the house structure.


